
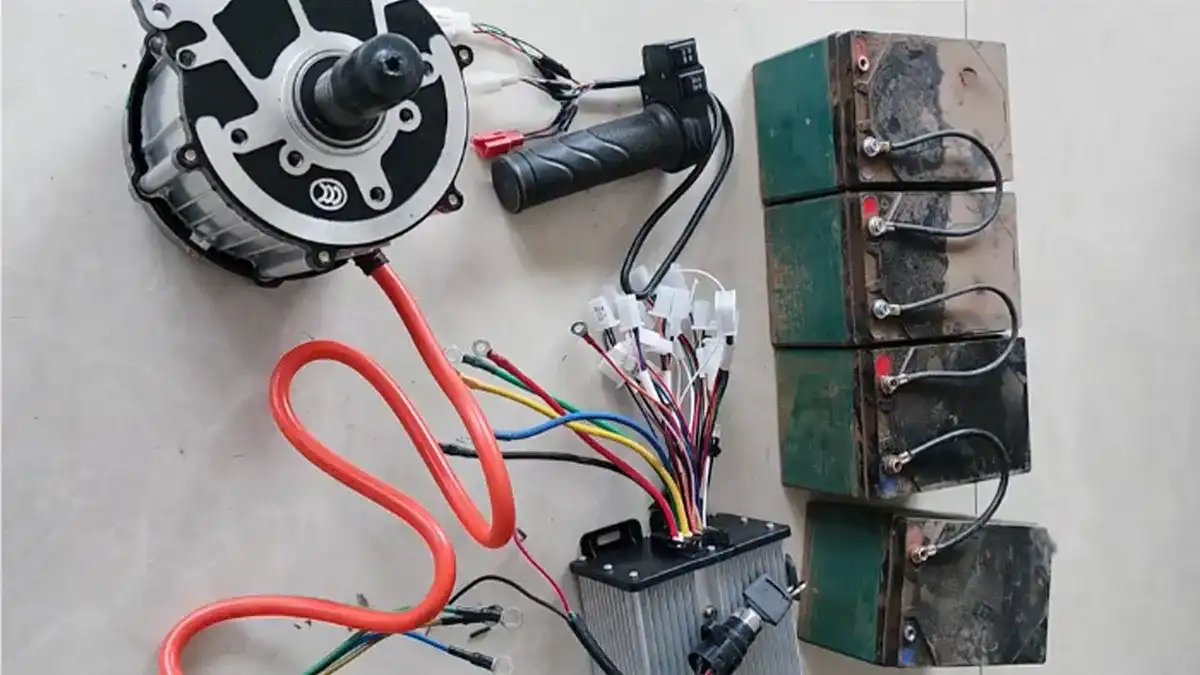
Quick Diagnosis and Repair Methods for Common Electric Bicycle Faults
Electric bicycle faults mainly occur in the battery, motor, controller, wiring, charger, and frame. Because the drive system is electrical and has few high-speed moving parts, troubleshooting focuses on wiring, connectors, switches, and electrical components rather than mechanical parts. This guide covers the characteristics of electric bicycle faults, a step-by-step troubleshooting process, common electrical and mechanical fault checks, and quick repair methods for common symptoms. It also includes three reference tables: general fault symptoms and troubleshooting approaches, common symptoms and quick repair methods, and common faults with diagnosis and troubleshooting. Always turn off power, disconnect the battery, and use the correct meter range before testing circuits or replacing components.
Characteristics of Electric Bicycle Faults and Troubleshooting Approaches
1. Characteristics of Electric Bicycle Faults
Malfunctions in electric bicycles primarily occur in the battery, motor, controller, wiring, charger, and frame. Common symptoms include: the bike failing to start, lack of power during operation, reduced range, inability to adjust speed, excessive speed, and unusual noises. Since electric bicycles primarily rely on electrical drive systems—with no high-speed moving parts and few fasteners—the focus of troubleshooting lies not in mechanical components but in the wiring and related components of the electrical drive system.
The primary method for testing electrical components involves using tools and meters to check the continuity and voltage at the input and output terminals of various components and circuits; specialized diagnostic equipment is required to detect internal faults in the controller.
1.1 Comprehensive Analysis of Electrical Failures
If an electric bicycle fails to start and the display panel shows no readout, the cause is most likely that the power switch has not been turned on, there is poor contact at the battery terminals, or there is an issue with the wiring—such as poor contact or disconnection at the connectors. If all of the above components are functioning normally, it indicates that one of the four major components (motor, controller, battery, and charger) is faulty. Among these, battery failure is the most common cause, followed by the controller, then the motor, and finally the charger.
a. Battery. The primary issue is insufficient power, which can result from a lack of charging, undercharging, reduced capacity due to battery aging, or the charger failing to charge properly. Whether the battery is charging normally can only be determined through a charging test.
b. Power Switch. Turn on the power switch and use a multimeter set to the resistance range to measure the resistance between the input and output terminals of the power switch. If the resistance reading is zero, it is functioning normally; if the resistance reading is infinite, the power switch is damaged and should be replaced.
c. Controller. If the motor operates abnormally or fails to run at all, speed control is unresponsive, or a brushless motor runs with a phase open, the exact location of the fault can only be determined by testing both the motor and the controller. Use a multimeter set to the DC voltage range to measure the voltage across the red wire at the controller’s output (connected to the throttle plug). If the output voltage is approximately 5 V, the controller is functioning normally; otherwise, the controller is burned out and must be replaced.
d. Hall-effect throttle. Use a multimeter set to the DC voltage range to measure the output voltage on the green wire at the throttle’s output terminal. If the output voltage is between 1 and 4.2 V, the throttle is functioning normally; otherwise, the throttle is burned out and must be replaced.
e. Charger. The primary issue is a failure to charge, which prevents the battery from functioning properly. Common faults include undercharging, overcharging, excessively long charging times, and failure to stop charging upon completion.
f. Motor. Common faults include broken motor leads, a detached or malfunctioning position sensor, broken windings, and damage to the brushes, commutator, or Hall effect sensors. Disconnect the motor from the controller, leaving all other wires connected, slowly rotate the motor, and use a multimeter to test the Hall sensor wires to check for changes in signal voltage. If there is no change in one phase, this indicates that the motor’s Hall sensor has burned out, causing a phase failure; the Hall sensor should be replaced.
g. Wiring. Common issues include short circuits or open circuits in transmission lines, loose connectors, malfunctioning brake cut-off switches, and power supply line problems.
1.2 Mechanical Faults of the Vehicle Frame
The main areas prone to mechanical faults in the vehicle frame include the wheel braking system, axles, and tires.
2. Troubleshooting Approach for Electric Bicycle Faults
2.1 Troubleshooting Process for Electric Bicycle Faults
Taking the Jincheng TDH18Z electric bicycle as an example, this section illustrates the general troubleshooting process for electric bicycle faults. The fault diagnosis process is shown in Figure 1.
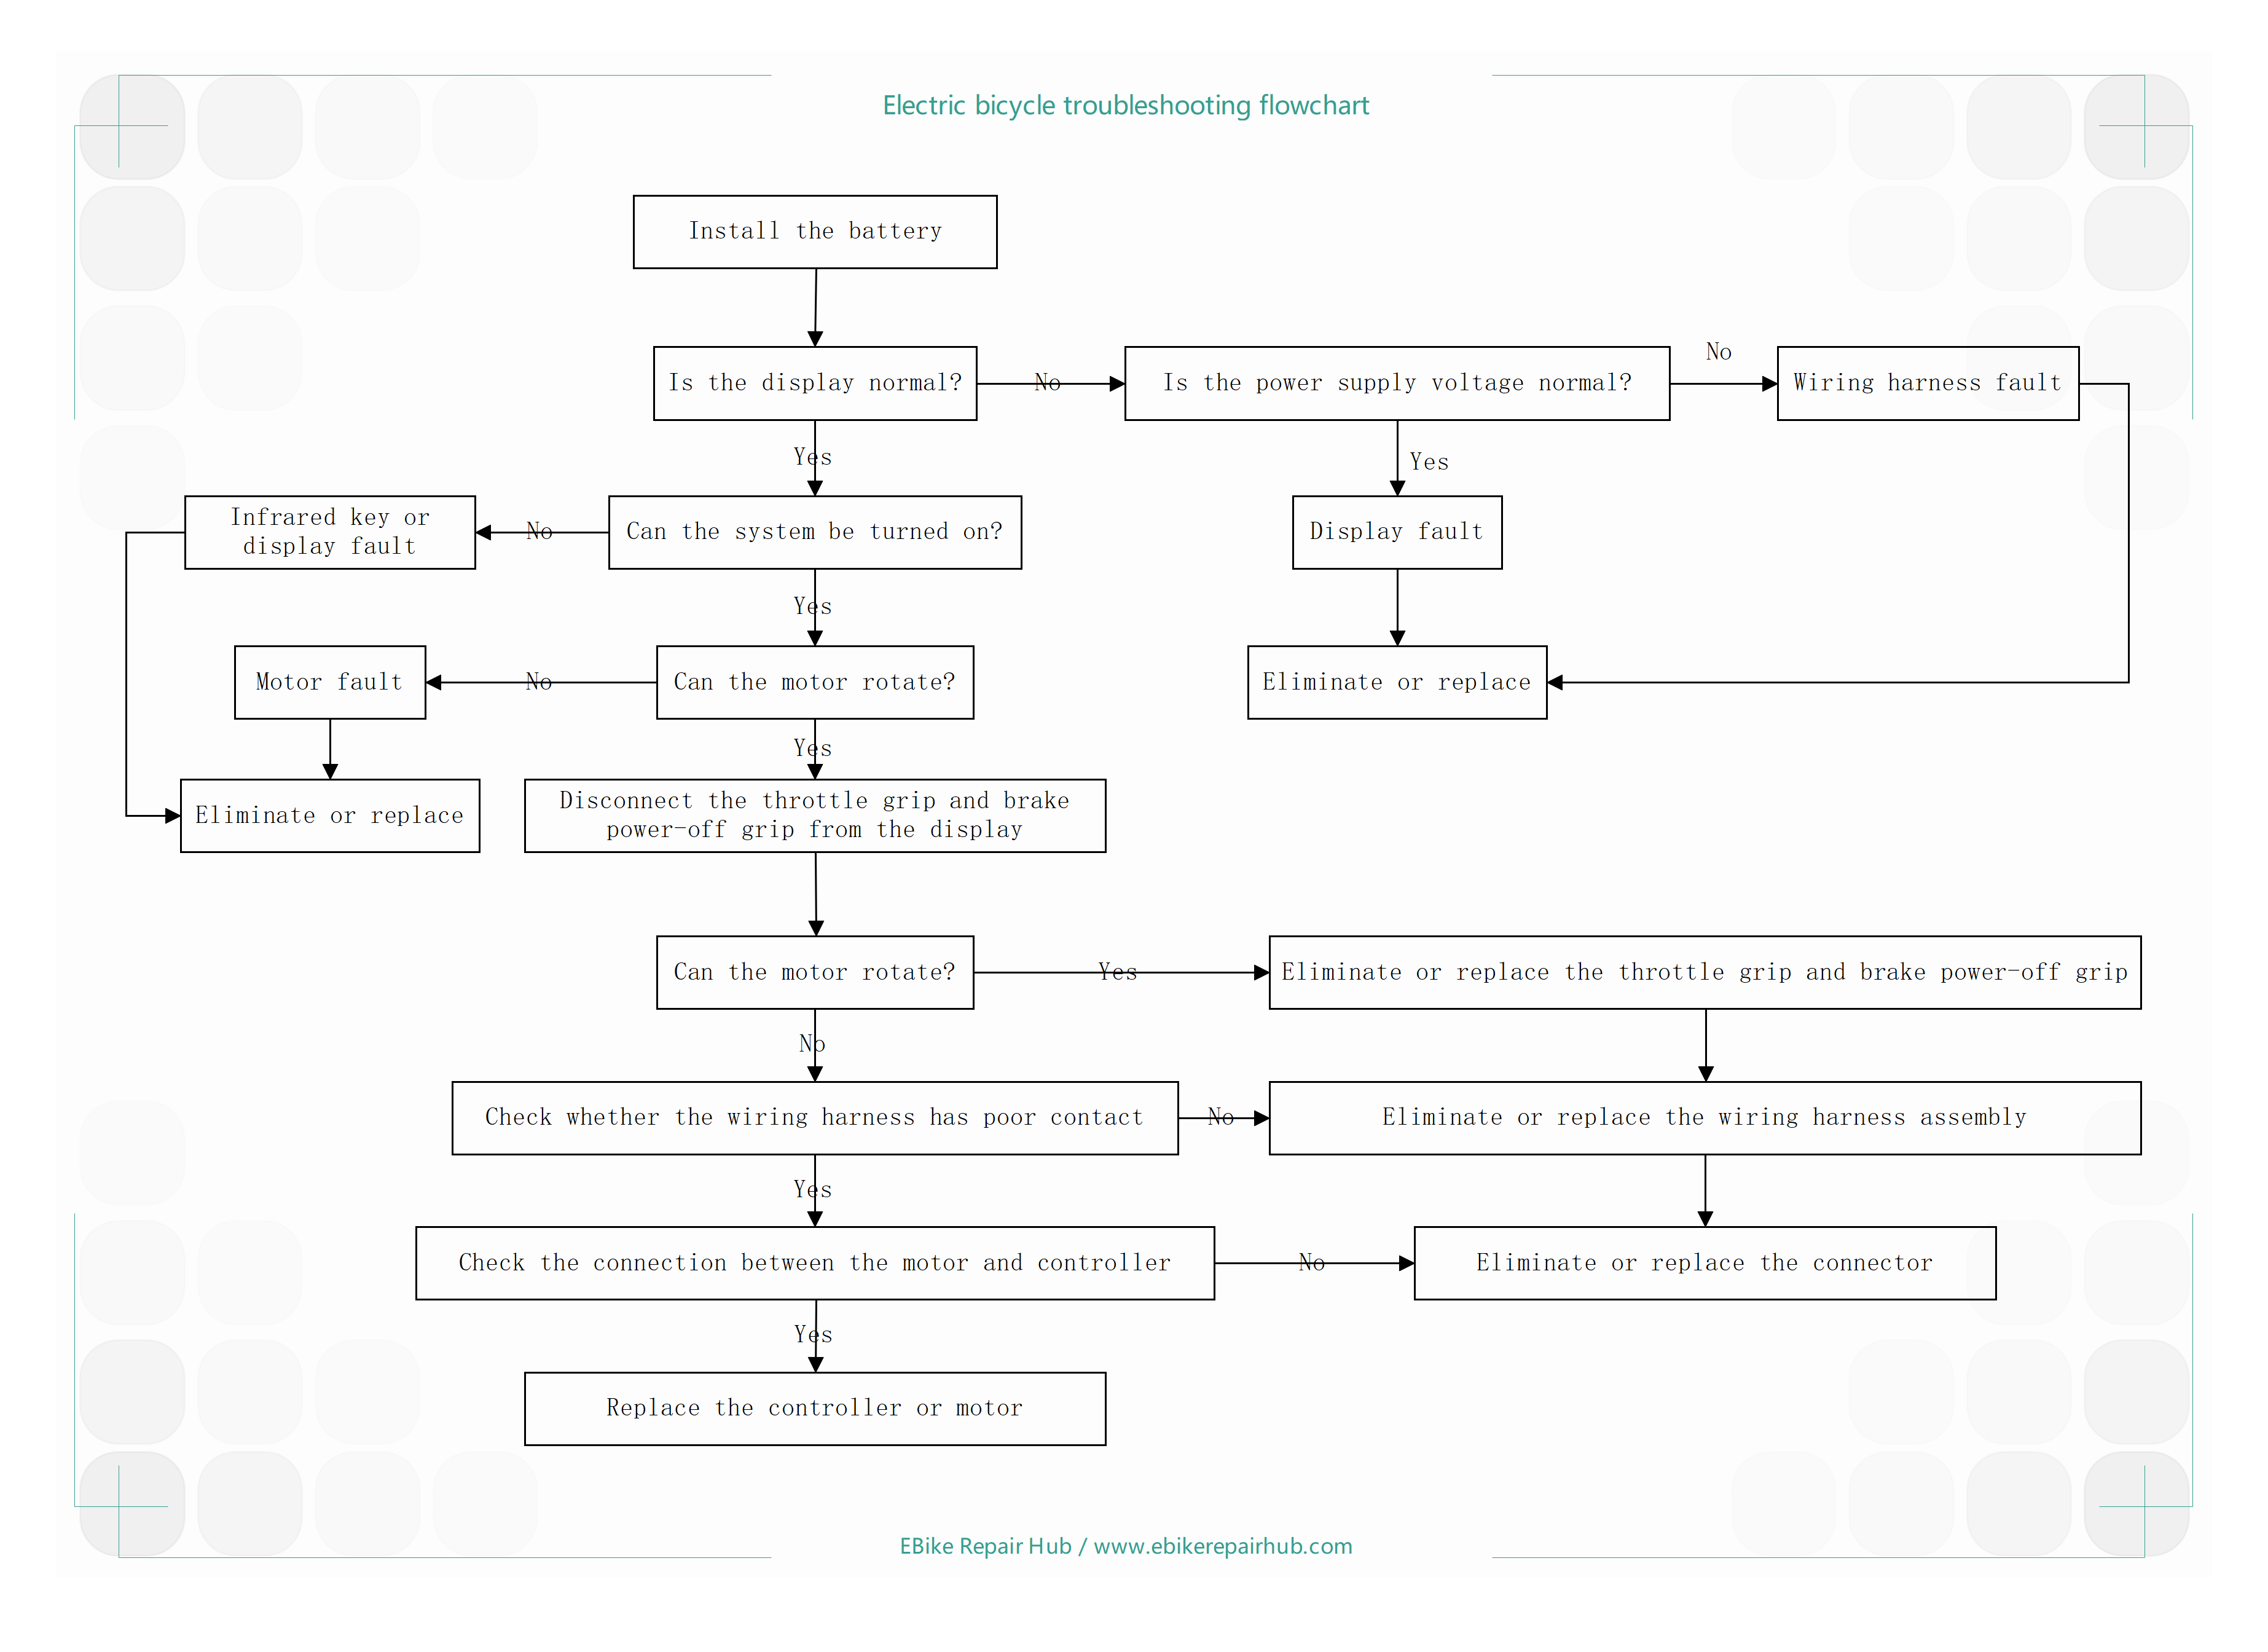
Figure 1: Electric Bicycle Fault Diagnosis Process
For the complete troubleshooting procedure, see: E-Bike Standard Diagnostic Procedure: Display to Motor →
2.2 Electric Bicycle Repair
See Table 1 for electric bicycle fault symptoms and troubleshooting approaches.
Table 1: Electric Bicycle Fault Symptoms and Troubleshooting Approaches
| Fault Symptoms | Troubleshooting Approach |
| Drive wheel does not rotate (i.e., the motor does not rotate) | 1) (With power on, unlock the power switch) Use a multimeter to check for voltage on the motor leads; which can indicate a fault in the wiring between the controller and the motor or in the control circuit ① If voltage is present, it indicates that the motor is damaged or there is an open circuit in the wiring between the controller and the motor; further troubleshooting is required ② If no voltage is present, it indicates a fault in the control circuit; proceed to the next step 2) Disconnect the controller’s brake power-off connector, then turn the speed control grip ① If the wheel turns, this indicates that the brake cut-off switch is faulty, causing a short circuit; replace the brake cut-off switch ② If the wheel does not turn, replace the original speed control knob with a known-good one for testing. If the wheel turns after the replacement, the original speed control knob is faulty and should be replaced ③ If the motor still does not turn after installing a new speed control knob, this indicates that the controller is faulty and should be replaced 3) Check the battery box contacts to determine whether the wheels are not turning due to a power supply issue. Use a multimeter set to the DC voltage range to check the battery box contacts and see if a voltage reading is displayed: ① If no voltage is displayed, and the dashboard indicator light does not illuminate when the power lock switch is turned on, possible causes include: a blown fuse; a wire has come loose or a solder joint has broken; replace the wire or resolder it ② If voltage is displayed, turn on the power lock switch, and the dashboard indicator light does not illuminate, this indicates that the power lock switch is faulty and not supplying power; replace it with a new power lock switch |
| When the power lock switch is turned on, the wheels spin continuously and cannot be braked (runaway) | Disconnect the plug connecting the controller to the speed control throttle to determine whether the fault lies with the speed control throttle or the controller: ① After disconnecting the speed control throttle plug, turn on the power lock switch; if the wheel does not rotate, the speed control throttle is damaged. Inspect the speed control throttle and ground wire. If the photosensitive film or magnet has come loose, reinstall or reattach it; if damaged, replace it ② After disconnecting the throttle grip connector, if the wheels still do not turn when the power lock switch is turned on, the controller is damaged and should be replaced. This fault is most often caused by poor contact in the throttle grip ground wire |
| The power lock switch does not supply power when turned on, or the fuse in the battery box blows immediately upon activation | Disconnect the controller power plug or the motor plug to determine the location of the fault: 1) After disconnecting the power connector, turn on the power lock switch. If the fuse blows, this indicates: ① A short circuit in the headlight circuit; ② A short circuit in the horn circuit; ③ A short circuit inside the power lock switch; ④ A short circuit within the instrument panel, which must be rectified 2) First reconnect the power plug, then disconnect the plug at the top corner, then turn on the power lock switch. If the fuse no longer blows, this indicates a motor malfunction; determine the cause and repair or replace the motor. 3) If the fuse continues to blow after following steps 1) and 2), this indicates a controller malfunction; the controller should be replaced 4) Another possible cause is an improperly selected fuse type, where the rated current is lower than required (the fuse is too thin) and cannot handle the electric bicycle’s current; a 20A fuse should be used |
| Slow speed (low motor speed) | 1) For photoelectric speed control throttles, open the throttle and remove the light-sensitive sensor. If the motor resumes operation normally, it can be determined that the sensor is too dirty, which affects light transmission and causes the speed to slow down. Clean or replace the light-sensitive plate (and clean the light-emitting device at the same time) 2) Use a multimeter set to the DC voltage range to check the controller’s power supply voltage and the motor lead voltage. Turn the speed control knob; the voltage change should be less than 1V. If the change exceeds 1 V, this indicates a controller malfunction; it should be replaced 3) If the motor emits abnormal noises while rotating, or if the motor housing becomes excessively hot during operation (to the point of being too hot to touch), this indicates a motor malfunction; it should be repaired or replaced 4) The battery voltage is too low; if the voltage is below 36 V under no-load conditions, it will approach a low-voltage state during operation, resulting in low power, slow speed, and a lack of momentum. The cause lies with the battery. The main reasons are: ① Excessive mileage has depleted the battery’s charge; it should be recharged promptly; ② If the battery cannot travel at least 12.5 km on a single charge after being fully charged, this indicates the end of its service life, and it should be replaced. 5) A malfunctioning charger may fail to fully charge the battery while incorrectly indicating a full charge, resulting in slow vehicle speed and a lack of power. It should be repaired or replaced promptly to ensure the battery is fully charged as soon as possible 6) A malfunctioning electric motor is also a cause of slow motor speed and insufficient power. Replacing it with a qualified electric motor will resolve the issue |
2.3 False Faults Caused by Improper Operation
The following are the main situations where improper operation is mistaken for a malfunction:
a. Accidental activation of the brake lever. When riding, if you habitually rest your hand on the brake lever and accidentally apply the brakes, this will cause the power to cut off and the vehicle to stop.
b. The controller’s overcurrent protection feature. When the battery current is too high, it can cause the motor to be overloaded, and the controller’s overcurrent protection feature will automatically cut off the power and stop the vehicle.
c. Controller undervoltage protection. When the battery voltage drops below 31.5V (normal is 36V), the controller’s undervoltage protection will automatically cut off power, causing the bike to stop.
d. Charging not performed in the required sequence. If charging is not carried out in the specified sequence, the battery may fail to charge, leading to the mistaken belief that the battery is damaged.
e. When turning the hub motor by hand, high-speed motors rotate quickly, while low-speed motors rotate more slowly; this may be mistaken for a motor malfunction.
Quick Repair Methods for Common Electric Bicycle Faults
1.1 Common Electric Bicycle Fault Symptoms, Causes, and Quick Troubleshooting Methods
See Table 2 for common electric bicycle fault symptoms and quick repair methods.
Table 2 Common Electric Bicycle Symptoms, Causes, and Troubleshooting Methods
| Symptom | Cause | Troubleshooting Methods | |
| Motor runs, but dashboard lights do not illuminate | Faulty fuse in the battery compartment | Replace the fuse to ensure good contact | |
| Power switch is faulty | Replace the power switch | ||
| Burned-out battery terminals | Grind or replace the terminals | ||
| Poor connector contact | Adjust or replace the connector | ||
| Broken internal battery connections | Re-solder the battery connections | ||
| Battery has reached the end of its service life | Replace the battery | ||
| Internal battery cell failure | Replace the battery | ||
| Motor does not turn, dashboard light is on | No voltage at the controller's power input terminal | Inspect the wiring between the power supply and the controller | |
| Controller is not supplying power to the motor | Controller is faulty | ||
| Speed control throttle is damaged | Replace the throttle | ||
| Brake cut-off lever is damaged | Replace brake lever | ||
| Controller is faulty | Replace controller | ||
| Brake lever or brake cable is broken | Reconnect | ||
| Motor malfunction | Worn brushes | Replace brushes | |
| Commutator failure | Replace commutator or motor | ||
| Winding burned out, open circuit, or short circuit | Replace motor | ||
| Faulty position sensor on brushless motor | Replace Hall sensor | ||
| Controller has no output voltage (5V, 12V, or 15V) | Replace the controller | ||
| Motor runs continuously | Controller power MOSFET shorted | Repair or replace the controller | |
| Throttle grip malfunction | Replace or repair the throttle grip | ||
| Throttle grip is faulty; wires are connected incorrectly | Replace the throttle or rewire it | ||
| Motor runs slowly | Speed limiter plug is not disconnected | Disconnect the speed limiter plug | |
| Motor malfunction | Repair or replace the motor | ||
| Battery is old, undercharged, or cannot be charged | See the “Undercharged Battery” section | ||
| Throttle grip malfunction | Replace the throttle grip | ||
| Controller malfunction | Replace the controller | ||
| Mechanical failure | Inspect and repair mechanical components | ||
| Power does not turn on; blown fuse | Damaged controller | Replace the controller | |
| Phase-to-phase short circuit in the leads | Repair lead insulation | ||
| Motor runs intermittently | Battery failure | Battery voltage is at the undervoltage threshold | Fully charge the battery |
| Battery has reached end of service life | Replace the battery | ||
| Power lead fault | Poor battery terminal contact | File down the burnt areas or replace the battery | |
| Poor fuse contact | File down the scorched areas on the fuse or fuse holder, or replace the fuse tube and fuse holder | ||
| Power switch is burnt out, causing intermittent contact issues | Replace the power switch | ||
| Faulty brake cut-off lever or faulty lever lead | Adjust the lever according to standards; replace the lever or lead | ||
| Intermittent contact caused by a broken throttle cable | Replace the cable | ||
| Poor contact at the connector | Readjust the connector sockets | ||
| Poor soldering of components inside the controller | Repair or replace the controller | ||
| Motor failure | Severe brush wear | Replace the brushes | |
| Commutator oxidation and burn damage | Grind and clean the commutator | ||
| Poor contact in the brushless motor sensor | Replace the lead wires |
1.2 Common Faults and Troubleshooting Methods for Electric Bicycles
See Table 3 for common faults and troubleshooting methods for electric bicycles.
Table 3 Common Faults and Troubleshooting Methods for Electric Bicycles
| Fault Symptoms | Fault Diagnosis | Troubleshooting |
| Dashboard indicator light is off; motor does not rotate | ① No voltage between the controller and the motor a. Internal open circuit in the controller b. Speed control twist grip is damaged c. Broken wire in the throttle grip d. Incorrect wiring between the throttle grip and the controller ② Faulty brake cut-off switch ③ Motor windings burned out (open circuit or short circuit); damaged brushes or brush holders ④ There should be a 5V voltage between the controller and the Hall effect circuit or the throttle grip; if none is present, the controller is faulty ⑤ The speed control voltage between the controller and the speed control knob should be 1–5V. If the voltage remains constant or is absent, the controller is not at fault; the speed control knob is faulty | Replace the controller; clean the photosensitive plate and photosensitive tube inside the throttle grip, or replace the throttle grip; reconnect and readjust; or replace the motor; replace the controller; clean the photosensitive plate and photosensitive tube inside the throttle grip, or replace the throttle grip |
| After the power lock is released, the motor spins out of control and cannot be controlled | ① The three wires between the speed control knob and the controller are connected incorrectly ② The photosensitive plate on the speed control knob is dirty or detached; the light-emitting tube is broken or the solder joints have come loose ③ Components inside the controller are damaged | Reconnect and clean the photosensitive plate; replace the parts or the throttle grip; replace the controller |
| Motor speed is slow | ① The photosensitive plate or phototube inside the throttle grip is dirty ② Some components inside the throttle grip are damaged ③ Battery is low on charge, undercharged, or cannot be charged ④ Motor malfunction ⑤ Controller malfunction | Clean or replace the speed control knob; check or replace the battery or charger; replace the motor; replace the controller |
| Motor starts and stops intermittently | ① Battery is at critical undervoltage ② Poor contact at battery terminals ③ Poor contact between the fuse tube and its holder inside the battery box ④ Speed control grip lead appears to be partially broken ⑤ Brake cut-off switch failure ⑥ Poor contact at the power lock ⑦ Voltage cannot be modulated between the throttle and the controller. Throttle malfunction ⑧ Poor contact at the connector ⑨ Cold solder joints inside the controller⑩ Poor contact with the motor brushes; cold solder joints in the motor windings | Adjust the charging settings; clean; grind and adjust; grind or replace; reconnect; adjust or replace; replace or clean; replace the power lock; replace and clean the photosensitive film or phototube; reinsert the connector; if the problem persists, repair or replace; repair or replace; replace |
| Battery does not charge or is undercharged | ② Blown fuse in the battery compartment ③ Poor contact in the fuse holder ④ No output from the charger ⑤ Low output voltage from the charger ⑥ Poor contact between the charger plug and the power outlet ⑦ Charger indicator light shows incorrect status | Replace the fuse tube; polish or adjust; replace the charger; replace the charger; reseat or replace the component; adjust the charging time yourself or replace the charger |
| Abnormal | ⑤ Motor commutator surface is oxidized, burned, greasy, or worn; Loose commutator segments | Adjust, clean, repair, or replace the stator and rotor with the commutator; correct and adjust |
| Excessive motor current | Ring fire ③ Short circuit between the motor’s positive and negative terminals ④ Inter-turn short circuit ⑤ Short circuit between commutator segments ⑥ Excessive zero-start frequency on electric bicycles ⑦ Excessively tight fit between shaft and bearing | Replace the coil or rewrap the windings Replace the coil or rewrap the windings Clean and polish the commutator segments Avoid as much as possible Grind the shaft Use pedal assist |