
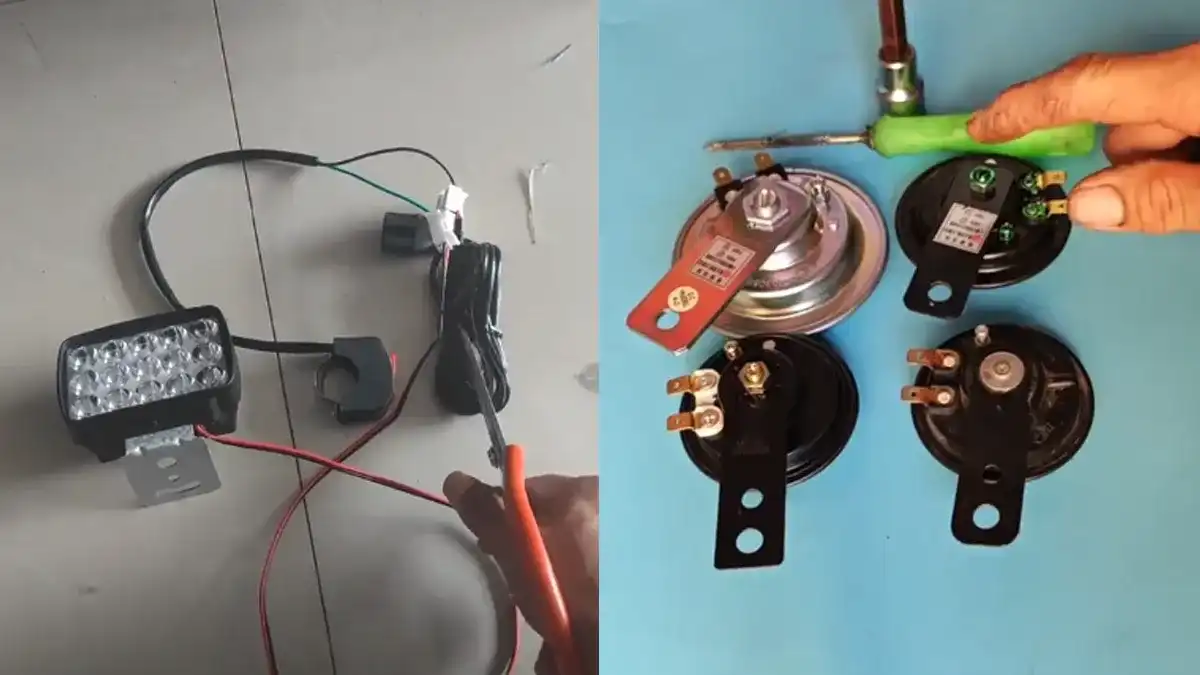
Electric Bicycle Lighting and Horn Fault Repair Experience: Testing, Diagnosis, and Repair Case Analysis
Lighting, signal, and horn faults are common on electric bicycles, but they are usually easy to trace because they follow clear patterns: no power, poor ground, wrong bulb rating, faulty flasher, or dirty contacts. This guide covers the lighting system, turn signal system, and electric horn in three parts. Each section first explains the typical symptoms and possible causes, then gives step-by-step troubleshooting procedures. A final section collects fourteen real repair cases, each presented from fault symptom to repair. The procedures apply to common 36V and 48V electric bicycles with a converter-fed 12V signal and lighting system; always confirm the vehicle’s rated voltage and bulb specifications before replacing parts.
Troubleshooting Guide for Electric Bicycle Lighting, Signals, and Horns
1. Troubleshooting the Lighting System
The following explanation uses the complete electrical system of a Century Star electric bicycle as an example.
1.1 Lighting System Not Functioning
Fault Symptoms:
When riding the electric bicycle at night and turning on the headlight switch, none of the bulbs in the lighting system illuminate.
Troubleshooting:
The following are possible causes for the lighting system not functioning:
a. A lighting bulb has burned out.
b. Poor internal contact in the headlight switch.
c. A loose connection somewhere in the circuit, resulting in poor contact at a wire terminal or connector.
The diagnosis and troubleshooting methods for this fault are as follows:
a. Turn on the power switch, press the electric horn button, or flip the turn signal switch. If the horn sounds and the turn signals work normally, this indicates that the lighting system is not faulty.
b. The headlight switch and brake switch are a single-pole, double-throw switch. When the faulty switch is in the brake position and the brake lights illuminate, this indicates that the circuit upstream of the switch is functioning normally; the fault may be a burned-out light bulb or a malfunctioning headlight switch. Upon disassembling the headlight switch, corroded switch contacts were discovered. This was caused by water ingress into the headlight switch. After disassembling the components, polishing them, and reassembling for testing, the headlights, daytime running lights, and headlight indicator light resumed normal operation.
1.2 Dim Lighting
Fault Symptoms:
When riding the electric bicycle at night, the lights are dim and lack sufficient brightness.
Troubleshooting:
The following are possible causes of dim lighting:
a. The rated power and voltage of the headlight, taillight, and headlight indicator bulbs do not match the power supply.
b. The battery is low on charge.
c. Excessive contact resistance somewhere in the circuit or at switch contacts, resulting in insufficient load current.
d. A short circuit somewhere in the circuit.
The diagnosis and troubleshooting methods for this fault are as follows:
a. Verify that the lighting bulbs meet the specified requirements. If not, replace them with new ones.
b. Turn on the power switch. If the electric bicycle runs normally, the battery charge is sufficient; if it fails to start, the battery is discharged and should be recharged.
c. Check the circuit for loose connections or short circuits, and verify whether the contact resistance between switch contacts is too high. If so, repair as necessary.
2. Troubleshooting Approach for the Turn Signal System
2.1 None of the Turn Signals Illuminate
Fault Symptoms:
When the power switch is turned on or the turn signal switch is moved left or right, neither the turn signals nor the turn indicator lights illuminate.
Troubleshooting:
The turn signal circuit is a dual parallel circuit. If none of the turn signals illuminate, aside from the possibility that all bulbs are burned out, the fault may lie in the signal circuit bus or in the common section of the turn signal circuit—such as severe burnout or poor contact of the internal contacts in the flasher unit, severe damage to the turn signal switch, or an open circuit or short circuit in the common section of the turn signal circuit.
The diagnostic and troubleshooting methods are as follows:
The inspection procedure is as follows: Remove the left and right rear turn signal lens covers, take out the bulbs, and inspect them. If both the left and right turn signal bulbs are burned out, this indicates that the reason for the turn signals not lighting up is that all the bulbs have burned out; a thorough inspection should be conducted to determine why the bulbs burned out. If both the left and right turn signal bulbs are functioning normally, this indicates that the reason for the turn signals not lighting up is a fault somewhere in the signal circuit bus or the common section of the turn signal circuit.
(1) To determine whether the fault is in the signal circuit bus or in the common section of the turn signal circuit, turn on the ignition switch, press the horn button, or squeeze the brake lever. If the horn does not sound and the lights do not come on, the cause of the turn signals not working at all is in the signal circuit bus. If the horn sounds and the lights come on, the cause is a fault somewhere in the common portion of the turn signal circuit; the diagnostic method for this is described in the following section.
(2) Inspection of the Turn Signal Circuit
① Turn on the power switch, short-circuit the two terminals of the flasher unit, or toggle the turn signal switch left and right. If the turn signals illuminate, the flasher unit is faulty and should be discarded and replaced with one of the same model. If the turn signals still do not work, proceed with the following inspection method.
② Using a multimeter set to the 50V DC voltage range, measure the voltage to ground on the flasher unit’s output and input leads.
If only one lead has a normal voltage to ground, the flasher unit is faulty; if neither lead has voltage to ground, there is no voltage input to the flasher unit; if both leads have normal voltage to ground, the circuit downstream is functioning properly.
(3) Checking the Turn Signal Switch. Locate the turn signal switch wiring harness and use the DC voltage 50V range on a multimeter to measure the voltage between the center terminal of the turn signal switch and ground. If no voltage is displayed, there is an open circuit or other fault in the wiring between the flasher unit and the turn signal switch; if voltage is displayed, the fault is likely in the turn signal switch. At this point, use the multimeter to measure the voltage at the left and right terminals of the turn signal switch separately. If no voltage is displayed at either terminal, the fault lies in the turn signal switch, and it should be repaired (sand the contacts with fine sandpaper and increase the contact pressure between the slider and the contacts; if normal operation is not restored, replace it with a new one); if normal voltage is displayed at both the left and right terminals of the turn signal switch, this indicates an open circuit somewhere in the turn signal switch’s output wiring.
2.2 Turn Signal Bulbs Burn Out Easily
Fault Symptoms:
Under normal operating conditions, turn signal and turn indicator bulbs burn out easily.
Troubleshooting:
The causes of frequent turn signal bulb burnout can be considered from the following aspects:
a. The turn signal bulb filament is aged, and its quality does not meet requirements.
b. The rated voltage of the turn signal bulb does not match the power supply voltage.
c. The converter is malfunctioning.
2.3 Dim Turn Signals
Fault Symptoms:
When the ignition switch is turned on or the turn signal switch is moved left or right, all turn signals and turn indicator lights emit an abnormally dim light.
Troubleshooting:
The causes of dim turn signals can be considered from the following two aspects:
a. The rated voltage of the installed bulb is too high and does not meet standards (i.e., the bulb’s rated voltage exceeds the power supply voltage).
b. Due to a circuit issue, the bulb’s actual power consumption is significantly lower than its rated power.
Dim turn signals can be caused either by a fault in the common section of the signal circuit or by a fault somewhere in the turn signal circuit itself.
2.4 Turn Signal Flashing Frequency Is Too Fast
Fault Symptoms:
According to safety standards, the flashing frequency of turn signals is generally 65 to 120 times per minute, with 70 to 80 times per minute being optimal. If the flashing frequency exceeds the specified standard, it indicates that the turn signals are flashing too rapidly.
Troubleshooting:
The causes of excessive turn signal flashing frequency can be considered from the following aspects:
a. Mismatch between the turn signal bulb and the flasher unit’s power rating. If the turn signal bulb is rated too high, it will cause the flashing frequency to increase.
b. A malfunction in the flasher unit itself.
c. A change in the current within the turn signal circuit.
Troubleshooting steps are as follows:
a. Check the specifications of the turn signal bulb. Pay particular attention to whether the bulb’s wattage is too high. If so, replace it with a bulb that meets the standard.
b. Inspect the flasher unit and replace it with a standard flasher of the same model. If the turn signal flashing frequency returns to normal, this indicates that the flasher unit is faulty. For electronic flasher units, adjust the bias resistor in the electronic circuit; for capacitor-type or mechanical flasher units, increase the contact gap or enhance the spring tension to slow down the turn signal flashing frequency.
c. Check whether all wire connections, connectors, and ground terminals in the turn signal circuit are secure and reliable. If they are corroded or loose, sand them down and tighten them.
2.5 Turn Signal Flashing Frequency Is Too Slow
Fault Symptoms:
According to safety standards, the flashing frequency of turn signals is generally 65–120 times per minute, with 70–80 times per minute being optimal. If the flashing frequency is significantly lower than the specified standard, it indicates that the turn signals are flashing too slowly.
Troubleshooting:
The causes of a slow turn signal flashing rate are as follows:
① Mismatch between the turn signal bulb and the flasher unit. Selecting a turn signal bulb with too low a wattage will cause the turn signal and indicator lights to flash more slowly.
② The flasher unit itself is faulty. For example, in capacitor-type or electronic flasher units, degraded or damaged electronic components will cause the turn signal flashing frequency to be abnormal.
③ Excessive contact resistance somewhere in the turn signal circuit.
Troubleshooting methods are as follows:
① Check the specifications of the turn signal bulb. If the bulb’s wattage is too low, replace it with a bulb that meets the standard.
② Inspect the flasher unit and replace it with a standard flasher of the same model. If the flashing frequency is normal after replacement, this indicates that the original flasher unit was faulty. In this case, for electronic flasher units, adjust the bias resistor in the electronic circuit; for capacitive or mechanical flasher units, reduce the contact gap or weaken the spring tension to increase the turn signal flashing frequency.
③ Check whether there are any loose connections or high contact resistance in the turn signal circuit; you can quickly locate the fault using the resistance setting on a multimeter.
2.6 Unequal Flashing Frequencies of Left and Right Turn Signals
Fault Symptoms:
When the ignition switch is turned on, or when the turn signal switch is moved left or right, the flashing frequencies of the left and right turn signals are inconsistent.
Troubleshooting:
The cause of the differing flashing frequencies between the left and right turn signals is not the flasher unit. The possible causes include the following:
① A fault inside the turn signal switch causes differences in contact resistance between the left and right turn signal circuits, which in turn alters the current flowing through the flasher unit, resulting in inconsistent flashing frequencies between the left and right turn signals.
② The total power of the left and right turn signals differs. If the total power of the turn signals on one side is greater than that on the other, or if a turn signal bulb on one side is burned out, this will result in unequal total resistance between the two sides, causing the left and right turn signals to flash at different rates. The side with the higher total bulb power will have a faster flashing rate, while the opposite side will have a slower rate; the side with a burned-out bulb will also have a relatively slower flashing rate.
③ If there is a loose connection or corrosion somewhere in the turn signal circuit on one side, it will increase the total resistance of that side’s circuit, causing the left and right turn signals to flash at different frequencies; the side with the higher total resistance will have a slower flashing frequency.
Troubleshooting methods are as follows:
① Check the turn signal switch. First, disconnect the turn signal switch from the circuit. Then, using the ohmmeter setting on a multimeter, measure the resistance between the turn signal switch’s input wire and the output wires for the left and right turn signals, respectively. The resistance should normally be less than 0.5 Ω. If there is a significant difference between the two sides, this indicates high contact resistance between the turn signal switch’s contacts and the slide plates. Disassemble the turn signal switch, polish the contacts and slide plates, and increase the spring tension to reduce contact resistance.
② Inspect the left and right turn signal bulbs. The rated values of the left and right turn signal bulbs should be the same; otherwise, replace them with bulbs that meet the standard and have the same rated value.
③ Inspect the turn signal circuit on the side with the slower flashing frequency, identify any loose or corroded connections, and address them.
2.7 Turn Signal Lights Are On but Do Not Flash
Fault Symptoms:
When the turn signal switch is moved to the left or right, the turn signal lights and indicator lights are on but do not flash.
Troubleshooting:
The following are possible causes for the turn signal lights being on but not flashing:
① The flasher unit is connected in reverse.
② The flasher unit is incompatible with the turn signal bulb.
③ There is a fault inside the flasher unit.
④ Insufficient battery power.
⑤ Poor contact in the turn signal switch.
⑥ The turn signal filament is burned out.
The diagnostic and troubleshooting procedures are as follows:
a. Check whether the connection between the flasher unit and the external circuit meets the specified requirements. The terminal marked with the letter “L” should be connected to the turn signal, and the terminal marked with the letter “B” should be connected to the power supply. Incorrect polarity in capacitive or electronic flasher units can easily damage the unit.
b. Check whether the bulb specifications meet the vehicle’s original requirements. A bulb with too low a wattage will reduce the current, preventing the heating element inside a mechanical flasher from reaching normal operating temperature and causing it to malfunction; a capacitive flasher may stop working due to insufficient charging of its internal capacitor.
c. Replace the flasher with one of the same specifications. If the turn signals flash normally, the fault lies with the flasher. This may be due to stuck contacts or insufficient contact clearance; in such cases, file down the contacts or increase the contact clearance to restore the flasher to its original condition.
d. The supply voltage must meet the specified requirements. If the supply voltage is too low, the turn signals will not flash; they will only flash normally when the rated voltage is reached.
e. The turn signal switch must make good contact. Touch the input wires of the turn signal switch to the left and right turn signal output wires, respectively. If the turn signals flash, this indicates a poor internal contact in the turn signal switch; the switch should be repaired or replaced.
f. Check whether the bulb filament is burned out. If so, replace the burned-out turn signal bulb.
2.8 Turn Signal on One Side Does Not Illuminate
Fault Symptoms:
When the ignition switch is turned on and the turn signal switch is moved to one side, the turn signal illuminates; however, when the switch is moved to the other side, the turn signal does not illuminate.
Troubleshooting:
If the turn signal illuminates when the turn signal switch is moved to one side, this indicates that the circuit before the turn signal switch is functioning normally. If the turn signal does not illuminate when the switch is moved to the other side, this indicates a fault in the turn signal switch, the circuit downstream of the switch, or the bulb. Possible causes include the following:
a. The turn signal switch is faulty.
b. All turn signal bulbs on the affected side are burned out.
c. There is poor contact between the bulb and the socket.
d. There is an open circuit or poor contact somewhere in the turn signal circuit on the affected side.
The diagnostic and troubleshooting methods are as follows:
a. Remove the housing of the non-illuminated turn signal and check if the bulb is burned out. If the turn signal bulb is burned out, replace it; if the turn signal bulb is not burned out, proceed with the following inspection steps.
b. First, disconnect the turn signal switch from the circuit, then use the resistance setting on a multimeter to test for continuity on the faulty side of the turn signal switch. If there is no continuity, this indicates poor contact between the internal contacts of the turn signal switch or a poor ground connection at the bulb socket; troubleshoot accordingly.
2.9 Only One Turn Signal on One Side Is Not Illuminating
Fault Symptoms:
When the ignition switch is turned on and the turn signal switch is activated, only one turn signal on one side does not illuminate, while the other bulbs function normally.
Troubleshooting:
The following are possible causes of this issue:
a. The turn signal bulb is burned out.
b. An open circuit in the power wire at the bulb socket.
c. Poor ground connection at the bulb socket.
d. Poor contact between the turn signal bulb and its socket.
Troubleshooting steps are as follows:
a. Remove the housing of the faulty turn signal and check whether the bulb is burned out. If the turn signal bulb is burned out, replace it; if it is not burned out, proceed with the following checks.
b. Using the 50V DC voltage setting on a multimeter, measure the voltage between the power wire contacts on the socket and ground. If the voltage is normal, this indicates a poor ground connection at the socket or poor contact between the turn signal bulb and the socket; these issues should be resolved. If there is no voltage, this indicates a break in the power wire at the socket; inspect and repair the wire.
Common faults with electric horns include the horn not sounding, abnormal sound, reduced volume, frequent burning of the horn contacts, the horn sounding only once, and intermittent operation. The following section uses a ground-connected electric horn circuit as an example to explain the troubleshooting approach for these issues.
3. Troubleshooting Approach for Electric Horns
3.1 Electric Horn Does Not Sound
Fault Symptoms:
When the power switch is turned on and the electric horn button is pressed, the electric horn does not respond (no sound).
Troubleshooting:
In an electromagnetic vibrating electric horn, when the circuit supplies an intermittent current to the horn’s electromagnetic coil, the electromagnet attracts and releases the diaphragm and resonant disc, causing them to vibrate and produce sound. If there is no current flowing through the horn’s coil or if the coil is burned out, the horn cannot be supplied with intermittent current and will not sound. The following are possible causes for the horn not sounding:
a. Low battery charge.
b. Improper horn adjustment.
c. Internal malfunction of the electric horn:
① The coil is burned out.
② The contacts do not close.
③ The contacts are severely burned, resulting in excessive contact resistance.
④ An internal open circuit in the electric horn.
d. Faults in the electric horn circuit:
① Poor contact between the internal contacts of the electric horn button.
② An open circuit or short circuit somewhere in the electric horn circuit.
③ Improper grounding of the electric horn.
Troubleshooting and repair methods are as follows:
a. Turn on the power switch or toggle the turn signal switch left and right. If the turn signals do not illuminate or are dim, this indicates a low battery charge or a fault in the signal system bus. If the turn signals are bright, the fault lies in the electric horn circuit; diagnose and troubleshoot using the methods described below.
b. Adjust the electric horn. If the electric horn has a minor malfunction, it can be adjusted. To do so: First, loosen the lock nut on the contact adjustment screw. Using a screwdriver, slowly turn the adjustment screw to reduce the contact gap. If the electric horn sounds normal, tighten the lock nut. If the sound does not improve after repeatedly adjusting the electric horn’s adjustment screw, this indicates that the lack of sound is not caused by improper adjustment of the electric horn itself, but may be due to an internal fault in the electric horn or a fault in the external circuit.
c. Replace the electric horn with one of the same model. Turn on the power switch and press the electric horn button. If the sound is loud and clear, the fault lies with the original electric horn itself, and it should be disassembled for inspection. If the coil is burned out, it should be rewound, varnished, and dried; if the contacts do not close, they should be readjusted; if the contacts are severely burned, grind them down; if there is an open circuit, reconnect it. If, after replacing the electric horn with one of the same model and pressing the button, the horn does not sound or the sound quality is still unsatisfactory, this indicates a fault in the electric horn circuit.
d. Troubleshooting the electric horn circuit.
① Check the electric horn button. Use a screwdriver or a piece of wire to short-circuit the electric horn button. If the electric horn sounds loud and clear, this indicates a fault with the electric horn button; disassemble the electric horn button, polish the contacts, and increase the spring tension; then re-solder the terminals to prevent cold solder joints or loose connections. If the electric horn does not respond, this indicates a fault in the electric horn circuit.
② Checking for faults in the electric horn circuit. Turn on the power switch, take a wire, ground one end, and briefly touch the other end to both leads of the electric horn button to check for spark. If no spark occurs when touching either lead, the fault lies in the circuit downstream of the electric horn button. Finally, keep one end of this wire grounded and touch the other end to each of the electric horn’s terminals one at a time while pressing the electric horn button. If the electric horn produces a loud, clear sound, this indicates a poor ground connection; if there is no spark when touching either terminal, there is an open circuit somewhere between the electric horn button and the electric horn; if a spark occurs at one terminal, the circuit upstream of the electric horn is functioning normally; if a spark appears at one terminal but the horn does not sound when the other terminal is touched, this indicates a fault in the horn itself, and it should be replaced.
3.2 Abnormal Horn Sound
Fault Symptoms:
When the power switch is turned on and the electric horn button is pressed, the electric horn emits abnormal sounds such as a hoarse, shrill, or screeching noise.
Troubleshooting:
The following are possible causes of abnormal electric horn sound:
a. Low battery charge.
b. The electric horn is improperly adjusted or damaged.
c. The mounting screws for the electric horn are loose.
The diagnostic and troubleshooting procedures are as follows:
a. Turn on the power switch; if the electric bicycle does not start, this indicates that the battery is low on charge.
b. If the battery is fully charged, adjust the electric horn. If the sound returns to normal after adjustment, it indicates that the original electric horn was improperly adjusted.
c. If the sound does not return to normal after adjusting the electric horn, it indicates a fault with the electric horn itself. If the contacts are burnt, they should be polished; if the diaphragm, resonator plate, or armature are loose, they should be retightened.
3.3 Reduced Electric Horn Volume
Fault Symptoms:
The electric horn volume is low while the electric bicycle is in motion.
Troubleshooting:
The volume of the electric horn is related to its operating current. The higher the operating current, the louder the sound. A decrease in volume is caused by a reduction in the horn’s operating current. The main causes are as follows:
a. Severe burnout of the electric horn contacts increases the contact resistance between them, causing the operating current to decrease.
b. Weakened contact pressure causes the contacts to remain open for longer periods; this also increases contact resistance, resulting in a decrease in the operating current.
c. Poor contact at the electric horn button increases the contact resistance between the contacts, reducing the operating current of the electric horn.
d. A loose connection or poor contact somewhere in the electric horn circuit increases the additional resistance in the circuit, leading to a reduction in the operating current of the electric horn.
For troubleshooting and repair, see the “Electric Horn Does Not Sound” section.
3.4 Frequent Burning of Electric Horn Contacts
Fault Symptoms:
The electric horn’s contacts burn out quickly shortly after use.
Troubleshooting:
The causes and solutions for frequent burning of electric horn contacts are as follows:
a. An open circuit in the electric horn’s capacitor increases sparking at the contacts, causing them to burn out. Replace the capacitor and, if necessary, replace the electric horn.
b. The electric horn has been operating for too long; reduce the time it is powered on.
c. The air gap in the electric horn’s core is too large, causing the operating current to increase; adjust the electric horn so that the air gap reaches the normal value.
d. The electric horn coil is short-circuited, causing excessive current to flow through the contacts. Rewind the coil according to the original specifications, then varnish and dry it.
3.5 Electric Horn Sounds Continuously
Fault Symptoms:
When the power switch is turned on and the electric horn button is pressed, the electric horn sounds continuously; even after releasing the button, the horn continues to sound. Sometimes, the electric horn sounds continuously as soon as the power switch is turned on, even without pressing the electric horn button.
Troubleshooting:
The causes and solutions for the electric horn sounding continuously are as follows:
a. The electric horn button contacts are stuck together; sand the contacts to restore normal function.
b. The electric horn button is shorted; the fault should be eliminated.
c. There is an internal ground fault in the electric horn; disassemble the horn to locate the ground fault.
d. There is a ground fault somewhere in the electric horn wiring; locate and eliminate the ground fault in the wiring.
3.6 The Electric Horn Sounds Only Once
Fault Symptoms:
When the power switch is turned on and the electric horn button is pressed, the electric horn sounds only once.
Troubleshooting:
The causes and troubleshooting steps for the electric horn sounding only once are as follows:
a. The electric horn contacts are severely stuck together and cannot open; grind the contacts to restore normal operation.
b. The electric horn contacts are shorted; repair them.
c. The internal capacitor of the electric horn has failed and is shorted; replace the capacitor.
3.7 Electric Horn Sounds Intermittently
Fault Symptoms:
When the power switch is turned on and the electric horn button is pressed, the electric horn sounds intermittently.
Troubleshooting:
The causes and solutions for an electric horn that sounds intermittently are as follows:
a. The electric horn button has poor ground contact. Remove the button for inspection, and resolve any issues found.
b. The electric horn wiring is loose; simply tighten it.
Case Studies on Repairing Electric Bicycle Lighting, Signal Systems, and Horns
Case 01: None of the Electric Bicycle Lights Come On
Fault Symptoms:
When the power switch is turned on and the headlight switch is set to the “on” position, but the headlight, parking light, and instrument panel light all remain off.
Troubleshooting:
Century Star electric bicycles operate on a 36V power supply. The lighting switch has three positions: the off position, the headlight position (which controls the headlight and headlight indicator), and the parking light position (which controls the parking light and instrument panel light). The troubleshooting procedure for lights not illuminating on this electric bicycle is as follows:
Turn on the power switch, press the electric horn button, and simultaneously flick the turn signal switch. If the horn sounds and the turn signals work normally, this indicates that the power circuit is functioning properly. If the fault lies in the lighting system, remove the headlight and check that the headlight bulb is not burned out and that the connections are secure. This confirms that the cause of the lights not illuminating is not due to all the lights being burned out. Upon removing the lighting switch, it was found that the red wire terminal had come loose from the switch. Using a soldering iron, the red wire terminal was soldered back into place. After testing the lights, they illuminated normally, and the fault was resolved.
Case 02: Electric Bicycle Parking Light Does Not Illuminate
Fault Symptoms:
When riding a Xingyue electric bicycle at night, turning on the lighting switch caused the headlight and headlight indicator to illuminate normally, but the parking light remained off.
Troubleshooting:
The cause of this issue lies in the parking light circuit. First, remove the parking light. Upon inspection, the parking light bulb was found to be intact and made good contact with the socket. After turning on the power switch and the headlight switch, use a multimeter set to the DC voltage range to measure the voltage between the phase terminal of the socket and ground—it was zero. Additionally, the socket leads were not broken. Tracing the parking light wire revealed a diode connected in series on the line. When the two terminals of this diode were shorted together, if the parking light comes on, this indicates that the diode is open-circuited. After replacing the diode, the parking light functioned normally, and the fault was resolved.
Case 03: Dim Lighting on an Electric Bicycle
Fault Symptoms:
When riding the Xiao Lingying electric bicycle at night, the bicycle runs normally, but when the lighting switch is turned on, the headlight, parking light, and instrument panel light are dim.
Troubleshooting:
The Xiao Lingying electric bicycle uses a 48V battery. A converter transforms the 48V voltage to 12V to power the signal and lighting systems. In this bike’s lighting circuit, the electrical loads are connected to the positive terminal, while the control switch is connected to the ground terminal. The following factors may cause the lights to appear dim:
① Low battery charge.
② High contact resistance somewhere in the circuit.
③ The converter is damaged or does not match the rated voltage of the electrical loads.
④ The rated voltage of the lights is too high.
If the electric bicycle runs normally when the power switch is turned on and the throttle is twisted, this indicates that the battery is sufficiently charged. When the electric horn button is pressed, the horn sounds muffled; when the turn signal switch is flicked left or right, all turn signals emit a faint light. When squeezing the left and right brake levers, the brake lights also emit a faint glow, indicating that the supply voltage to the signal and lighting systems is low. An inspection revealed no loose connections or poor contacts in the wiring. Ultimately, the fault was determined to be in the converter. After replacing the converter, all the bike’s signal and lighting lights functioned normally, and the fault was resolved.
Case 04: Malfunctioning Turn Signals on an Electric Bicycle
Fault Symptoms:
A bicycle that had been in use for half a year was parked for over two months due to a business trip. When the rider attempted to ride it again, the turn signals malfunctioned, with the brightness and flashing frequencies varying among the four turn signals. Upon inspection at the repair shop, a faulty flasher unit was identified; however, replacing it did not resolve the issue. The turn signal bulbs were also suspected to be defective, but repeatedly replacing each bulb failed to resolve the problem.
Troubleshooting:
Upon turning on the power switch and activating the turn signal switch, the brightness and flashing frequency of the four turn signals were found to be inconsistent. Based on the user’s description and the vehicle’s symptoms, it was determined that there was a poor electrical connection in the turn signal circuit. After disconnecting the wiring connectors for each turn signal, a multimeter was used to measure the resistance between each turn signal’s current input wire and the vehicle body. The results showed that the front turn signal had virtually no continuity, although the bulb itself was in good condition. After removing the front turn signal assembly for testing, the resistance between the current input wire and ground (the assembly’s mounting screw) was measured to be ∞. This confirmed that there was a poor electrical connection between the front turn signal assembly’s mounting screw and the vehicle body. Further inspection revealed that the spring washer between the mounting screw and nut of the front turn signal assembly was rusted.
Since the front turn signal is grounded via the assembly mounting screw, but the screw hole in the vehicle body does not make direct contact with the screw, current flows through the mounting screw, a nut, a spring washer, a flat washer, and the screw hole to the vehicle body, causing faults such as inconsistent brightness or flashing frequency of the turn signal.
Replace the spring washer with a new one, sand the flat washer and the contact area between the vehicle body and the flat washer with sandpaper, and reinstall the removed components. The brightness and flashing frequency of all turn signals returned to normal, and the fault was resolved.
Case 05: Electric Bicycle Turn Signals Do Not Flash
Fault Symptoms:
When the power switch is turned on and the left and right turn signal switches are toggled, the turn signals illuminate but do not flash.
Troubleshooting:
There are several possible causes for the Hongdu electric bicycle’s turn signals not flashing:
① Low battery charge.
② Faulty flasher unit.
③ Turn signal bulbs with insufficient wattage.
④ Faulty converter.
When the power switch is turned on and the bike operates normally in electric-assist mode, this indicates that the battery has sufficient charge. If the electric horn sounds normally when pressed, this indicates that the converter and the main circuit mentioned above are functioning properly, so the fault is in the turn signal circuit.
Next, a working flasher was installed as a replacement, but the fault persisted. Then, remove the turn signal housing to find that the turn signal bulb has a wattage of 4W, whereas the standard requirement for this bike is 12V/8W. After replacing all turn signal bulbs, activate the turn signal switch, and the turn signals flash normally. Upon subsequent inquiry, the owner revealed that after the turn signal bulbs burned out previously, the repair shop had replaced them all with new bulbs. Note: There are many types of electric bicycles, and the voltages and bulb wattages used in their signaling and lighting systems vary significantly. When a bulb burns out, select a replacement with the correct rated voltage and wattage according to specifications; do not substitute bulbs arbitrarily.
Case 06: Electric Bicycle Turn Signal Flashing Too Fast
Fault Symptoms:
When the power switch is turned on and the turn signal switch is activated, the turn signals flash too rapidly.
Troubleshooting:
When turning while riding an electric bicycle and activating the turn signal switch, if the flashing frequency exceeds the safety standard—which allows 65 to 120 flashes per minute—this constitutes a fault of excessive flashing frequency. The quick troubleshooting steps are as follows:
① Check the specifications of the turn signal bulb. If the bulb’s wattage is too high or too low, replace it with a bulb that meets the specifications. Upon inspection, the bulb specifications were found to be normal.
② Check the flasher unit. The method is as follows: Use the replacement method—replace it with a flasher unit of the same model, then observe the turn signal’s flashing frequency to identify and resolve the cause of the fault. Replacing the capacitor inside the flasher unit with one of a higher rated capacitance will slow down the turn signal flashing frequency. Replacing the flasher unit resolved the issue.
Case 07: Electric Bicycle Turn Signals Do Not Illuminate
Fault Symptoms:
When the power switch is turned on and the left and right turn signal switches are toggled, neither the turn signals nor the turn indicator lights illuminate.
Troubleshooting:
This vehicle uses a 48V battery, which is converted to 12V by a converter to power the signal and lighting systems. The control switches for these systems are grounded, while the electrical components are connected to the phase line.
The procedure for checking why the turn signals are not illuminating is as follows:
① Turn on the power switch and press the electric horn button. If the horn sounds normally, this indicates that the 12V power supply is functioning properly, and the fault lies in the turn signal circuit.
② Remove the front left turn signal bulb. If the bulb and the other bulbs have good contact and are not burned out, but the problem persists after replacing the flasher unit…
③ Disassemble the turn signal switch and verify that the connector contacts are good. Upon further disassembly of the switch, it was found that the contacts and contact plates were burned out, and the tension of the slide spring had weakened. Sand the contacts and contact plates with sandpaper, and simultaneously stretch the slide spring to increase its tension. Reassemble all removed parts; the turn signals and indicator lights are now fully functional.
Case 08: One Side of an Electric Bicycle’s Turn Signal Lights Up, While the Other Side Glows Dimly
Fault Symptoms:
When the power switch is turned on or the turn signal switch is moved left or right, one turn signal operates normally, while the other glows dimly or the filament turns red.
Troubleshooting:
This phenomenon most commonly occurs in circuits where a single turn signal lamp serves both left and right turns. Under normal conditions, when the turn signal switch is moved to the right position, the turn signal indicator and the right turn signal should both illuminate normally, while the left turn signal should remain off.
Although current also flows through the left front and left rear turn signals, neither of them illuminates. This is because the turn signal indicator is connected in series with this branch, causing the current flowing through it to be extremely small—insufficient to heat the turn signal filaments and cause them to glow. Meanwhile, the voltage drop occurs primarily across the turn signal indicator, which has lower power (i.e., higher filament resistance), allowing it to illuminate normally. When the turn signal switch is moved to the left position, the same principle causes the turn signal indicator and the left front and left rear turn signals to illuminate normally, while the right turn signal remains off.
If the turn signal indicators and turn signals are not matched, or if there is contact resistance somewhere in the circuit, it can result in one side of the turn signals lighting up while the other side glows faintly.
Upon inspection, the rated voltage and power of the turn signals and indicator lights met the specified requirements; bulb contacts were good; and the turn signal switch showed no signs of burnout or poor contact. Ultimately, it was discovered that the left rear turn signal connector was severely corroded. The connector was cut off, the wires were connected directly, and the connection was wrapped with electrical tape, resolving the issue.
Case 09: Electric Bicycle Headlight Does Not Illuminate
The main causes of a headlight failure include: a broken bulb, poor contact in the bulb socket, loose solder joints in the wiring, and a damaged handlebar switch.
a. If the bulb is broken, replace it.
b. If the handlebar switch is faulty, use a multimeter to check whether the headlight switch on the handlebar is outputting voltage. If voltage is present, the switch is functioning normally; if no voltage is present, replace the handlebar switch.
Case 10: Electric Bicycle Taillight Does Not Work
The main causes of a non-functioning electric bicycle taillight are:
a. A burned-out bulb.
b. Poor contact in the bulb socket or connector.
c. Loose solder joints in the wiring.
d. A damaged power cut-off switch or poor wire contact; for models with a “brake-light-on” feature, the motor will not shut off in this situation.
e. Poor contact or a break in the negative wire of the controller plug.
f. A damaged power or lighting switch, or no voltage output on the yellow wire of the three-wire switch.
g. A break in the main bus.
Troubleshoot according to the causes listed above.
a. If the bulb is burned out, replace it.
b. If there is poor contact at the connector, reinsert it.
c. If the solder joints on the light wires have come loose, resolder them.
d. If the power switch is damaged, replace it.
Case 11: Electric Bicycle Horn Malfunction
Electric bicycle horns come in two types: electromagnetic and electronic.
Figure 1 shows the schematic diagram of an electronic horn. The battery voltage is converted by a conversion circuit to a supply voltage of 15–24 V. An oscillator circuit generates an alternating voltage of approximately 40 V at a specific frequency to drive the horn’s electric buzzer, which emits a loud sound through the diaphragm and resonant chamber.
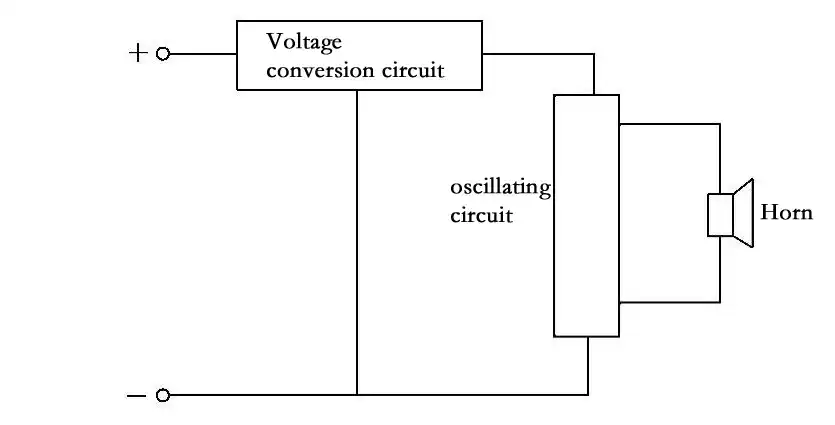
Figure 1: Schematic Diagram of the Electronic Horn System
a. The main causes of electromagnetic horn malfunctions are:
① Damaged horn; ② Damaged horn switch; ③ Short circuit in the connecting wires or connectors.
The specific troubleshooting methods are as follows: ① After pressing the horn switch, use a multimeter set to the voltage range to measure the voltage across the horn’s terminals. If the voltage is normal, the horn is damaged; if there is no voltage, the horn switch is damaged or there is an open circuit in the wiring.
② Short-circuit the two wires of the horn switch to test it. If the horn sounds, the switch is damaged and should be replaced; if the horn still does not sound, the horn is faulty and should be replaced.
b. Troubleshooting an unresponsive electronic horn. First, check the horn switch; if it is faulty, replace it. If the horn switch is functioning properly, the oscillator is faulty and should be replaced; if the horn is wired incorrectly—for example, if the positive and negative terminals of the electronic horn are reversed—rewire it.
Case 12: Electric Bicycle Turn Signals Do Not Illuminate
The main causes of electric bicycle turn signals failing to illuminate are: ① a faulty flasher unit; ② a faulty turn signal switch; ③ a short circuit in the wiring or connectors.
The specific troubleshooting steps are as follows:
If both the left and right turn signals fail to illuminate simultaneously, this indicates a faulty flasher unit, which should be replaced (provided the flasher unit is receiving normal power); if the left turn signal does not illuminate while the right one does, or vice versa, this indicates the flasher unit is functioning properly, so the turn signal switch and bulb should be inspected. Use a jumper wire to short-circuit the turn signal switch; if the turn signals flash, the switch is faulty and should be replaced; if the turn signals still do not flash after the jumper wire is connected, the bulb is faulty and should be replaced.
Case 13: Electric Bicycle Horn Does Not Sound
Fault Symptoms:
When the power switch is turned on and the electric horn button is pressed, the electric horn does not sound.
Troubleshooting:
The following are the possible causes for an electric bicycle’s electric horn not sounding:
① The battery voltage is too low.
② The connecting wires are loose, shorted, or broken.
③ Internal components of the electric horn are damaged.
④ The electric horn button is damaged.
The Xingyue electric bicycle battery directly powers the signal and lighting systems; specifically, the electric horn has a rated voltage of 36V. If the electric bicycle starts normally when the power switch is turned on, or if the left and right turn signals illuminate when the turn signal switch is moved left or right, this indicates that the signal and lighting circuit bus is functioning properly, suggesting that the fault lies in the horn circuit. Upon inspection, the horn was found to be properly grounded, the magnetic field coil showed no signs of short circuits or open circuits, and no abnormalities were found in the solder joints or connectors. Disassemble the left handlebar and short-circuit the light green and red wires on the electric horn button. If the electric horn sounds normally, this indicates that the electric horn button is faulty. Upon disassembling the electric horn button, severely burnt contacts were found. The contacts were sanded with fine sandpaper and then thoroughly cleaned. After reassembling all components, pressing the electric horn button resolved the fault.
Case 14: Abnormal Sound from Electric Bicycle Horn
Fault Symptoms:
When the power switch is turned on and the horn button is pressed, the horn produces a hoarse, muffled sound.
Troubleshooting:
During diagnosis, first turn on the turn signal switch; if the turn signals flash and illuminate normally, this indicates the battery has sufficient charge. Next, check the screws securing the electric horn bracket; none were found to be loose. Then, remove the front cover of the electric horn to inspect the contacts for burn-out, poor contact, or a broken spring plate. The contacts were burned out. After grinding them, the horn sounded normal when the button was pressed.
Case 15: Hoarse Sound from an Electric Bicycle’s Electric Horn
Fault Symptoms:
When the power switch is turned on and the electric horn button is pressed, the horn sounds hoarse.
Troubleshooting:
The following are possible causes of a hoarse electric horn sound:
① The battery voltage is too low.
② Poor contact somewhere in the circuit.
③ Internal components of the electric horn are damaged.
④ Poor contact in the electric horn button.
The battery supplied with Jieba electric bicycles has a voltage of 48V, while the signal and lighting circuits require a 12V voltage, which is converted by the power converter. When you turn on the power switch and press the electric horn button, the sound is hoarse; and when the turn signal switch is activated, the turn signals are dim, indicating that the signal power supply voltage is low. If the electric bicycle runs normally when the throttle is twisted, this indicates that the battery is fully charged. Based on these two checks, it was determined that the converter was faulty, so it was replaced. After replacement, pressing the electric horn button revealed that the muffled sound had disappeared, and flipping the turn signal switch caused the turn signals to illuminate normally.
Case 16: The Horn Sounds When Turning the Electric Bicycle’s Throttle Grip
There are two possible causes for the horn sounding when turning the electric bicycle’s throttle grip: first, electrical interference; second, incorrect wiring.
① Electrical interference. Separate the power cord from the horn wire and maintain a certain distance between them.
② Incorrect wiring—specifically, the horn wire has been connected to the speed control grip wire. Rewire them correctly.